# Channel Management
# 1. Overview
Presently, the Engage Module supports two reach approaches: Custom Channel and Push Notification. You can connect to the enterprise's self-built channel platform through a Custom Channel, or directly use the Push Notification channel preset by the TE operation module to achieve common App push platform capabilities.
# 2. Usage Instructions
# 2.1 Custom Channel
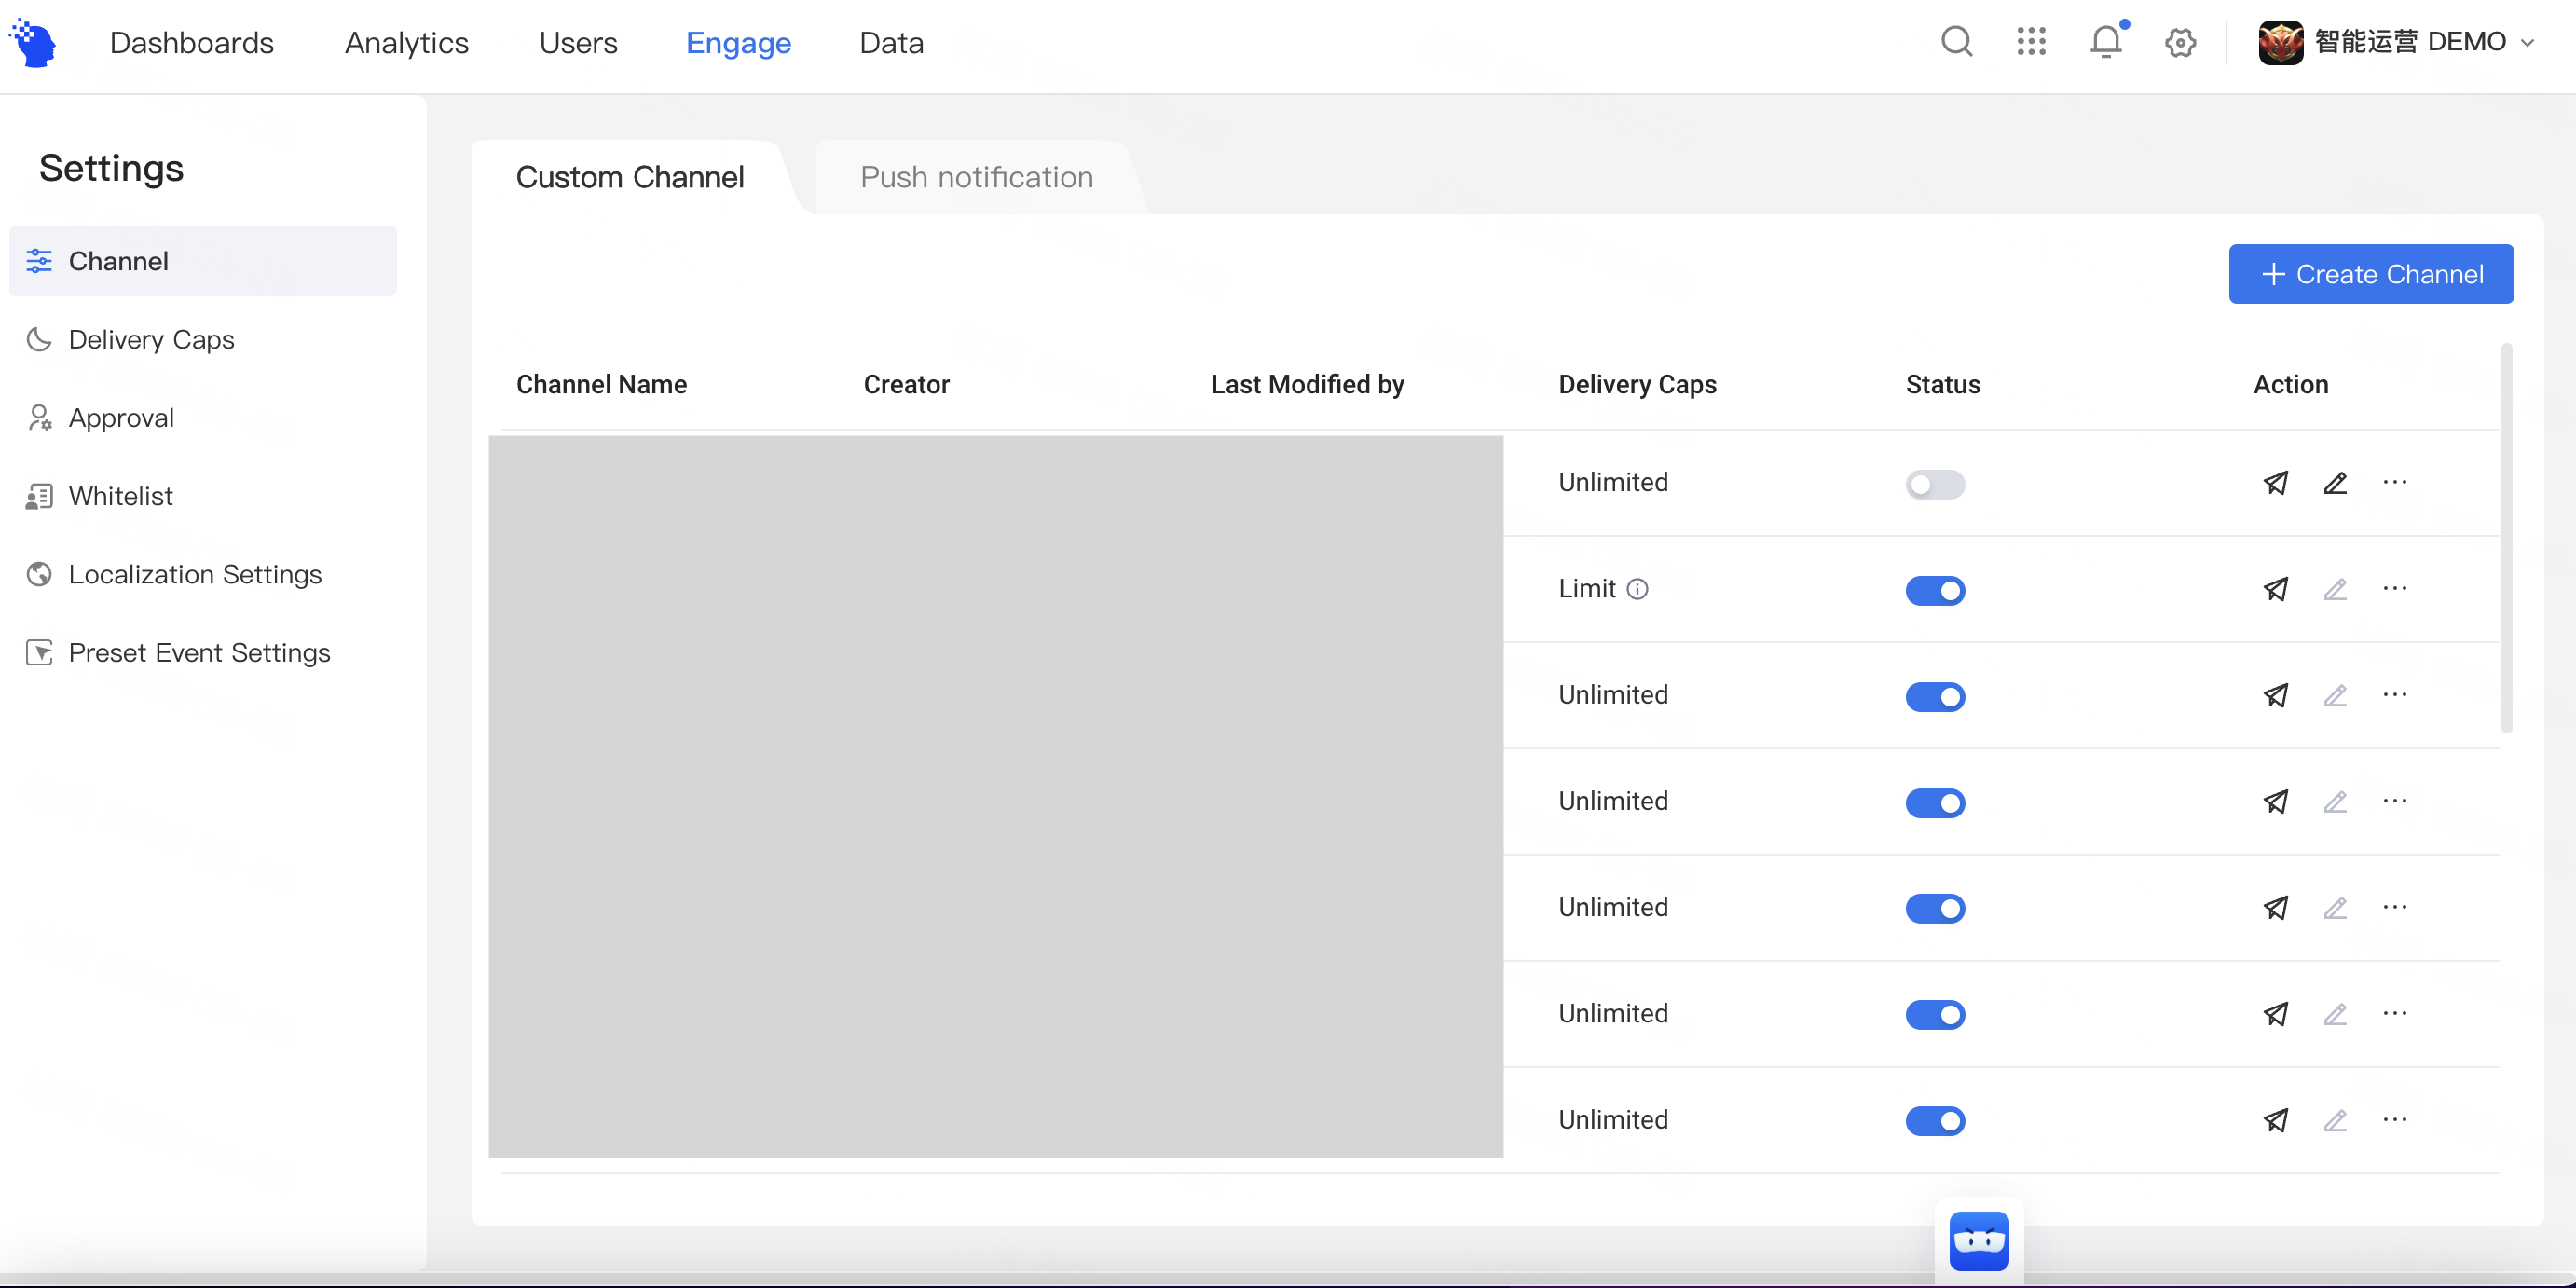
On the channel management page, you can create new channel and manage existing channels. Management operations like outgoing tests, enabling/disabling channels and editing/deletion are supported.
# Create New Channel
Click + Create Channel in the upper right corner and you will access the Create Custom Channel page.
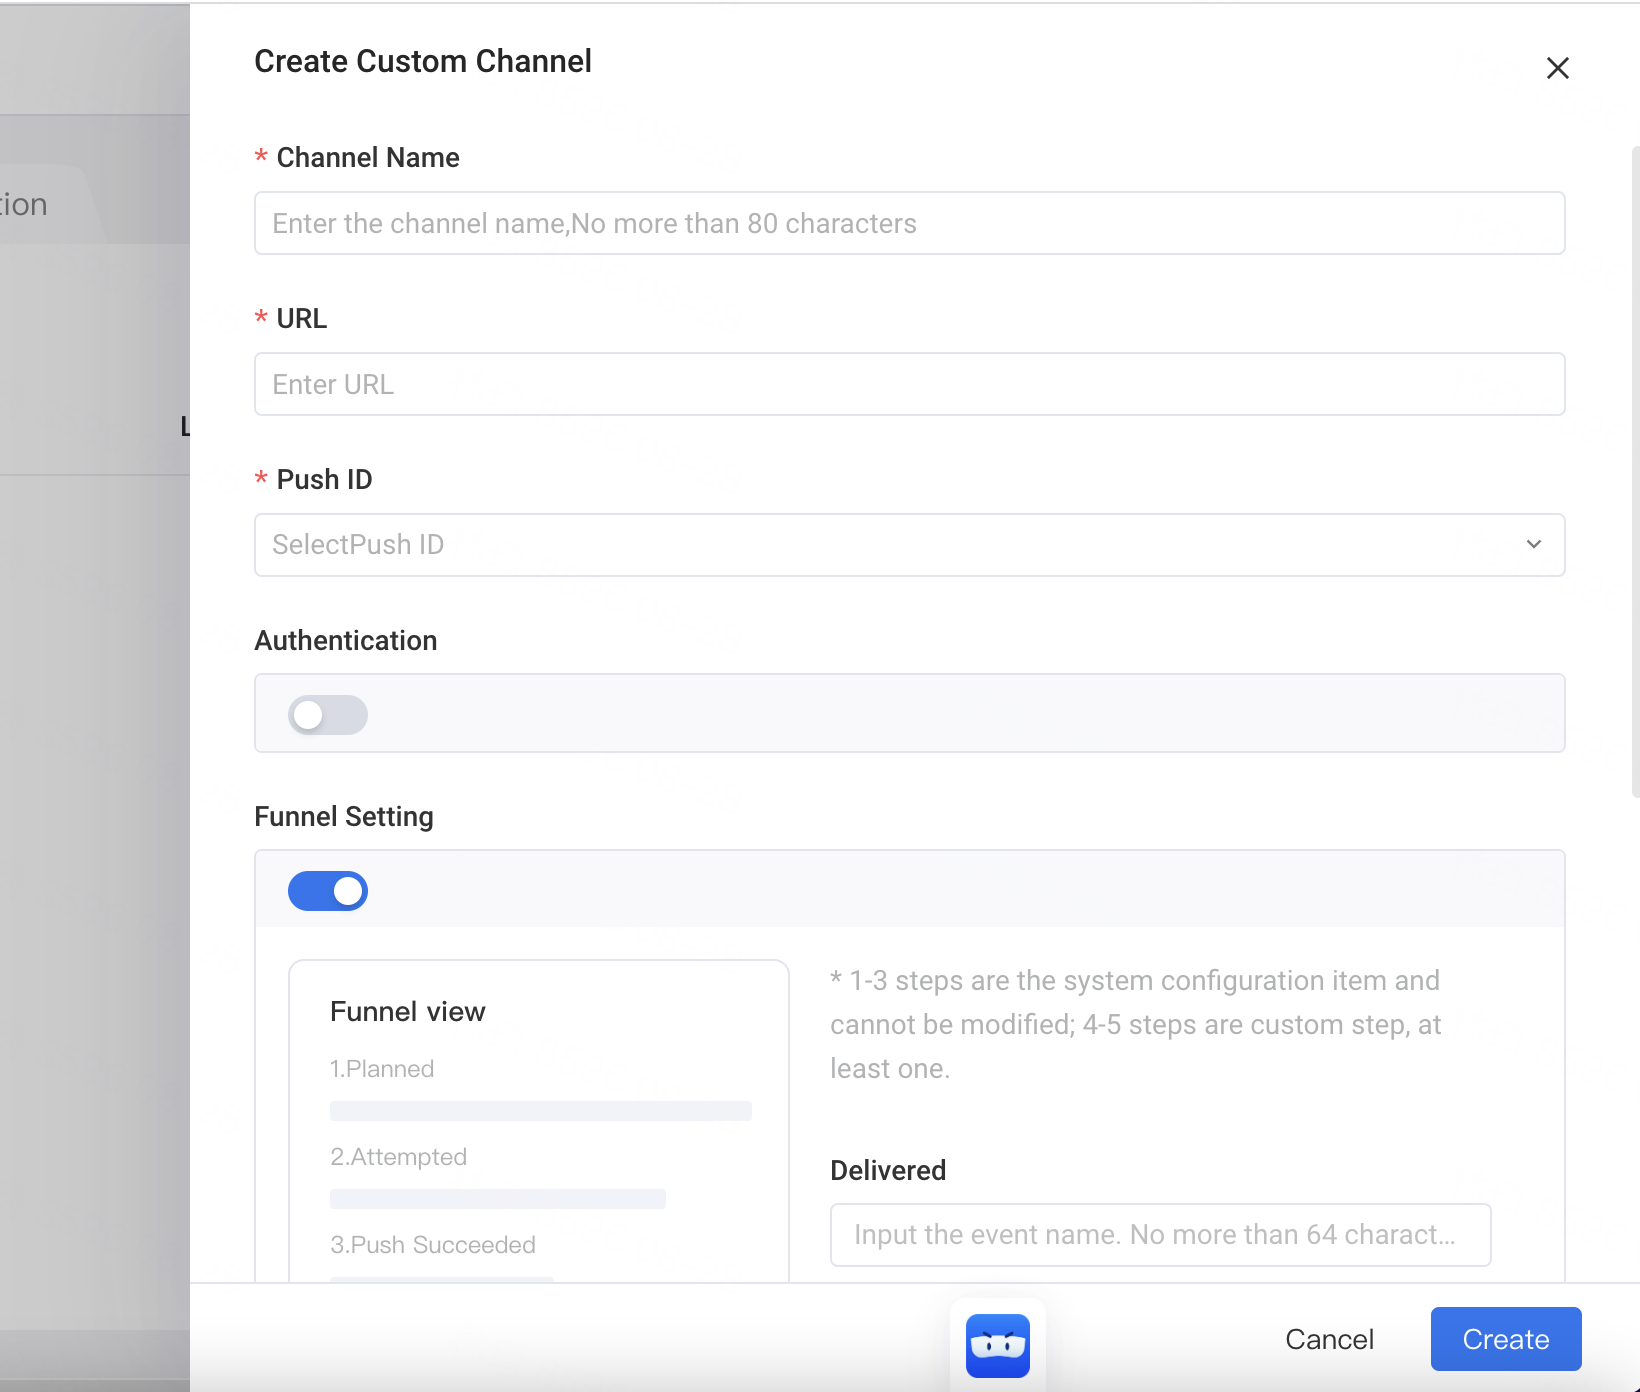
- Channel name: The name of the Custom channel. Duplicate names are not supported.
- ChannelURL: The address of the interface that receives pushing messages, which supports multiple channels configured for the same URL address.
- PushID: The ID type of target users who receive messages, supporting numerical and field user properties. In estimation of the number of target users, users having null IDs will be filtered out.
- Channel authentication: You can enable channel authentication by entering a secret key to prevent illegal invocations and improve channel security.
- Reach funnel configuration: After enabling the reach funnel, you can configure meta event names associated with funnel steps. This way, you will be able to view conversion data of configured steps from the detailed page of operation task data.
- Content template: You can customize the template of content sent to users through the channel, supporting field types likeText, Dynamic text, Number, Dropdown Selection, Date, Datetime and Array row. For example, prop content can be customized by configuring the array row type (prop ID and number of props) in the email outgoing channel.
- Custom parameter: Can be selectively added as a pass-through parameter based on channel requirements
For more information about connecting to CustomChannels, please see Custom Channel Access Document.
# Manage existing channels
- Send Preview
The channel that has been successfully created is in disabled state by default. You can send a test first and confirm that the test can be sent successfully before enabling the channel.
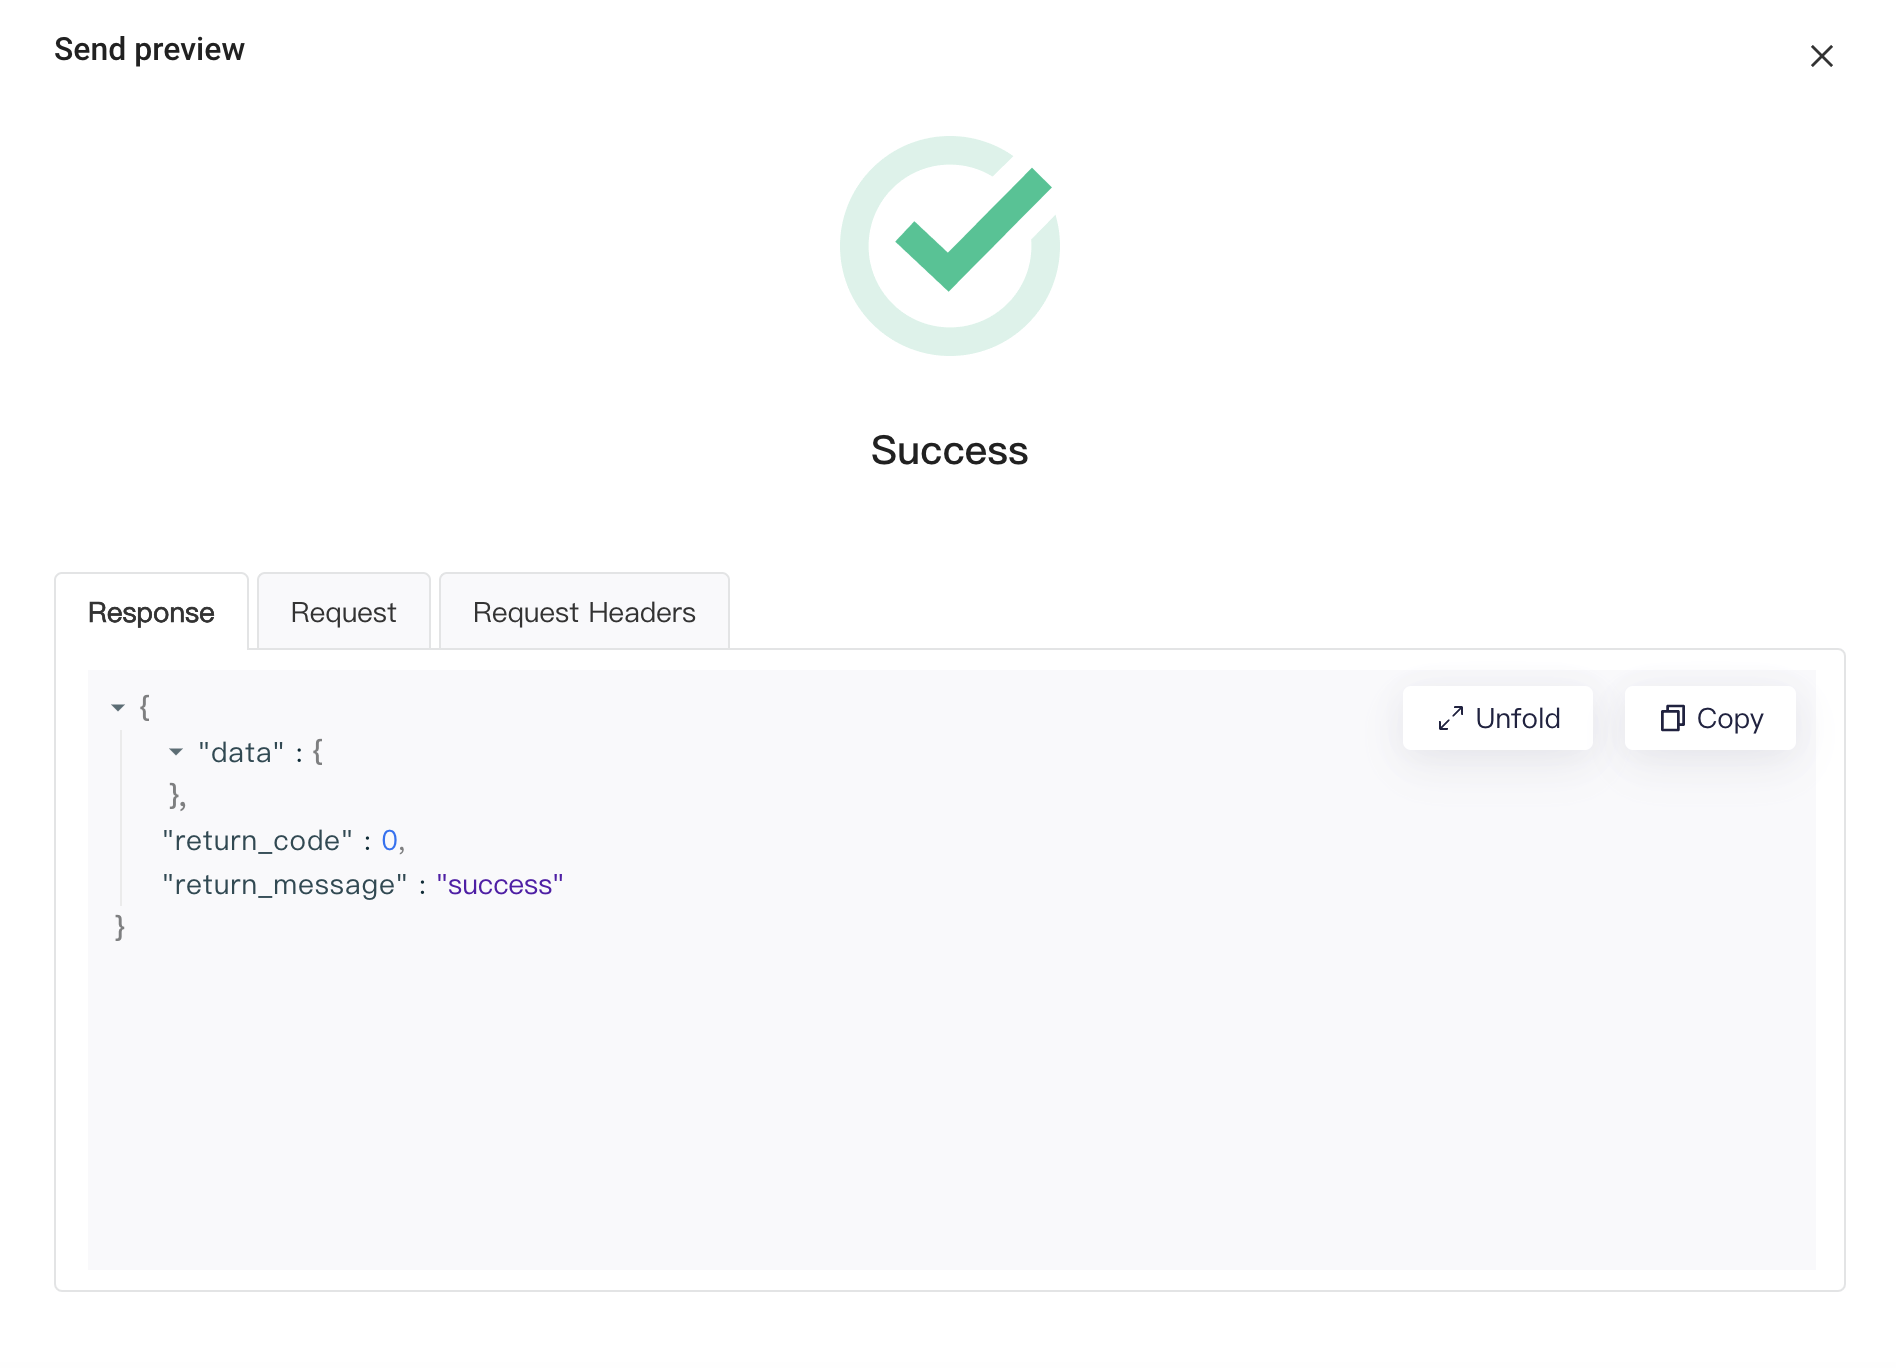
You can enter the Send Preview pop-up by clicking the small plane button in the operation and fill in the relevant information according to the configuration of the selected channel.
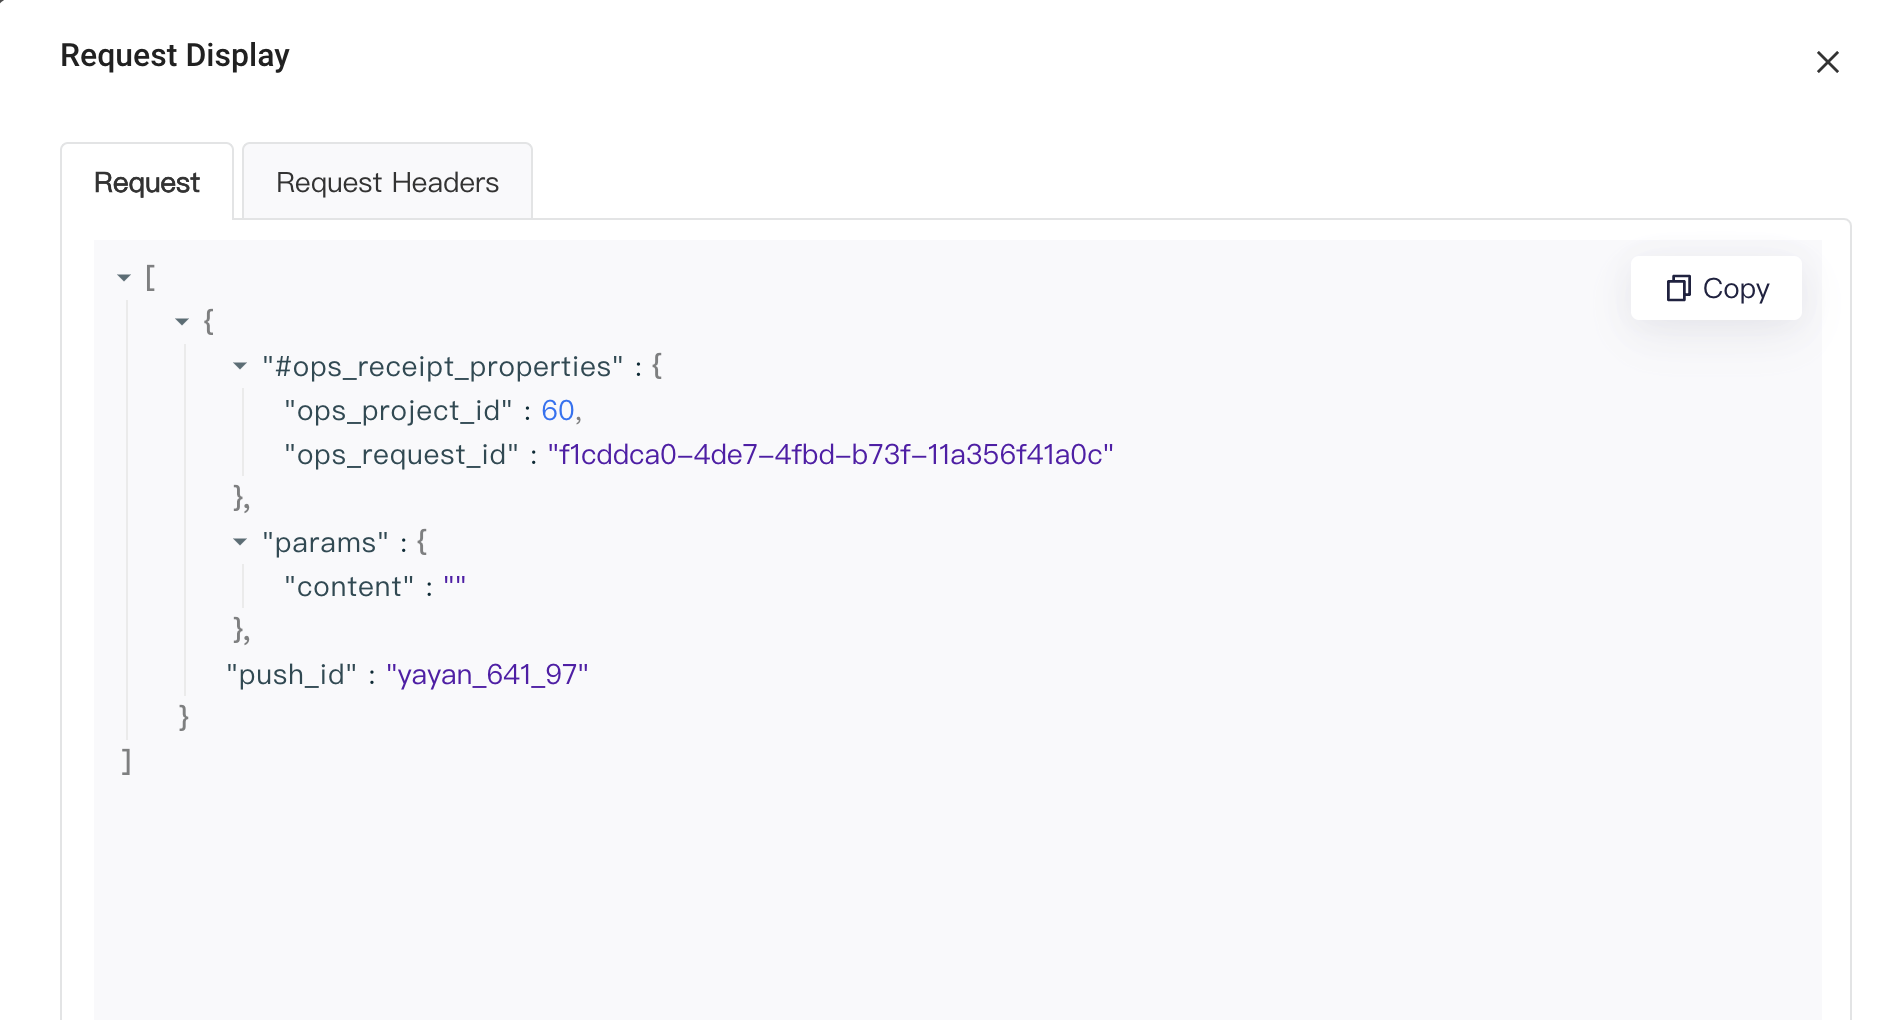
After that, you can click "View Request" to preview whether the request structure generated by the system meets your requirements for the send test. After confirming that it is correct, click "Send Preview" to carry out the send test.
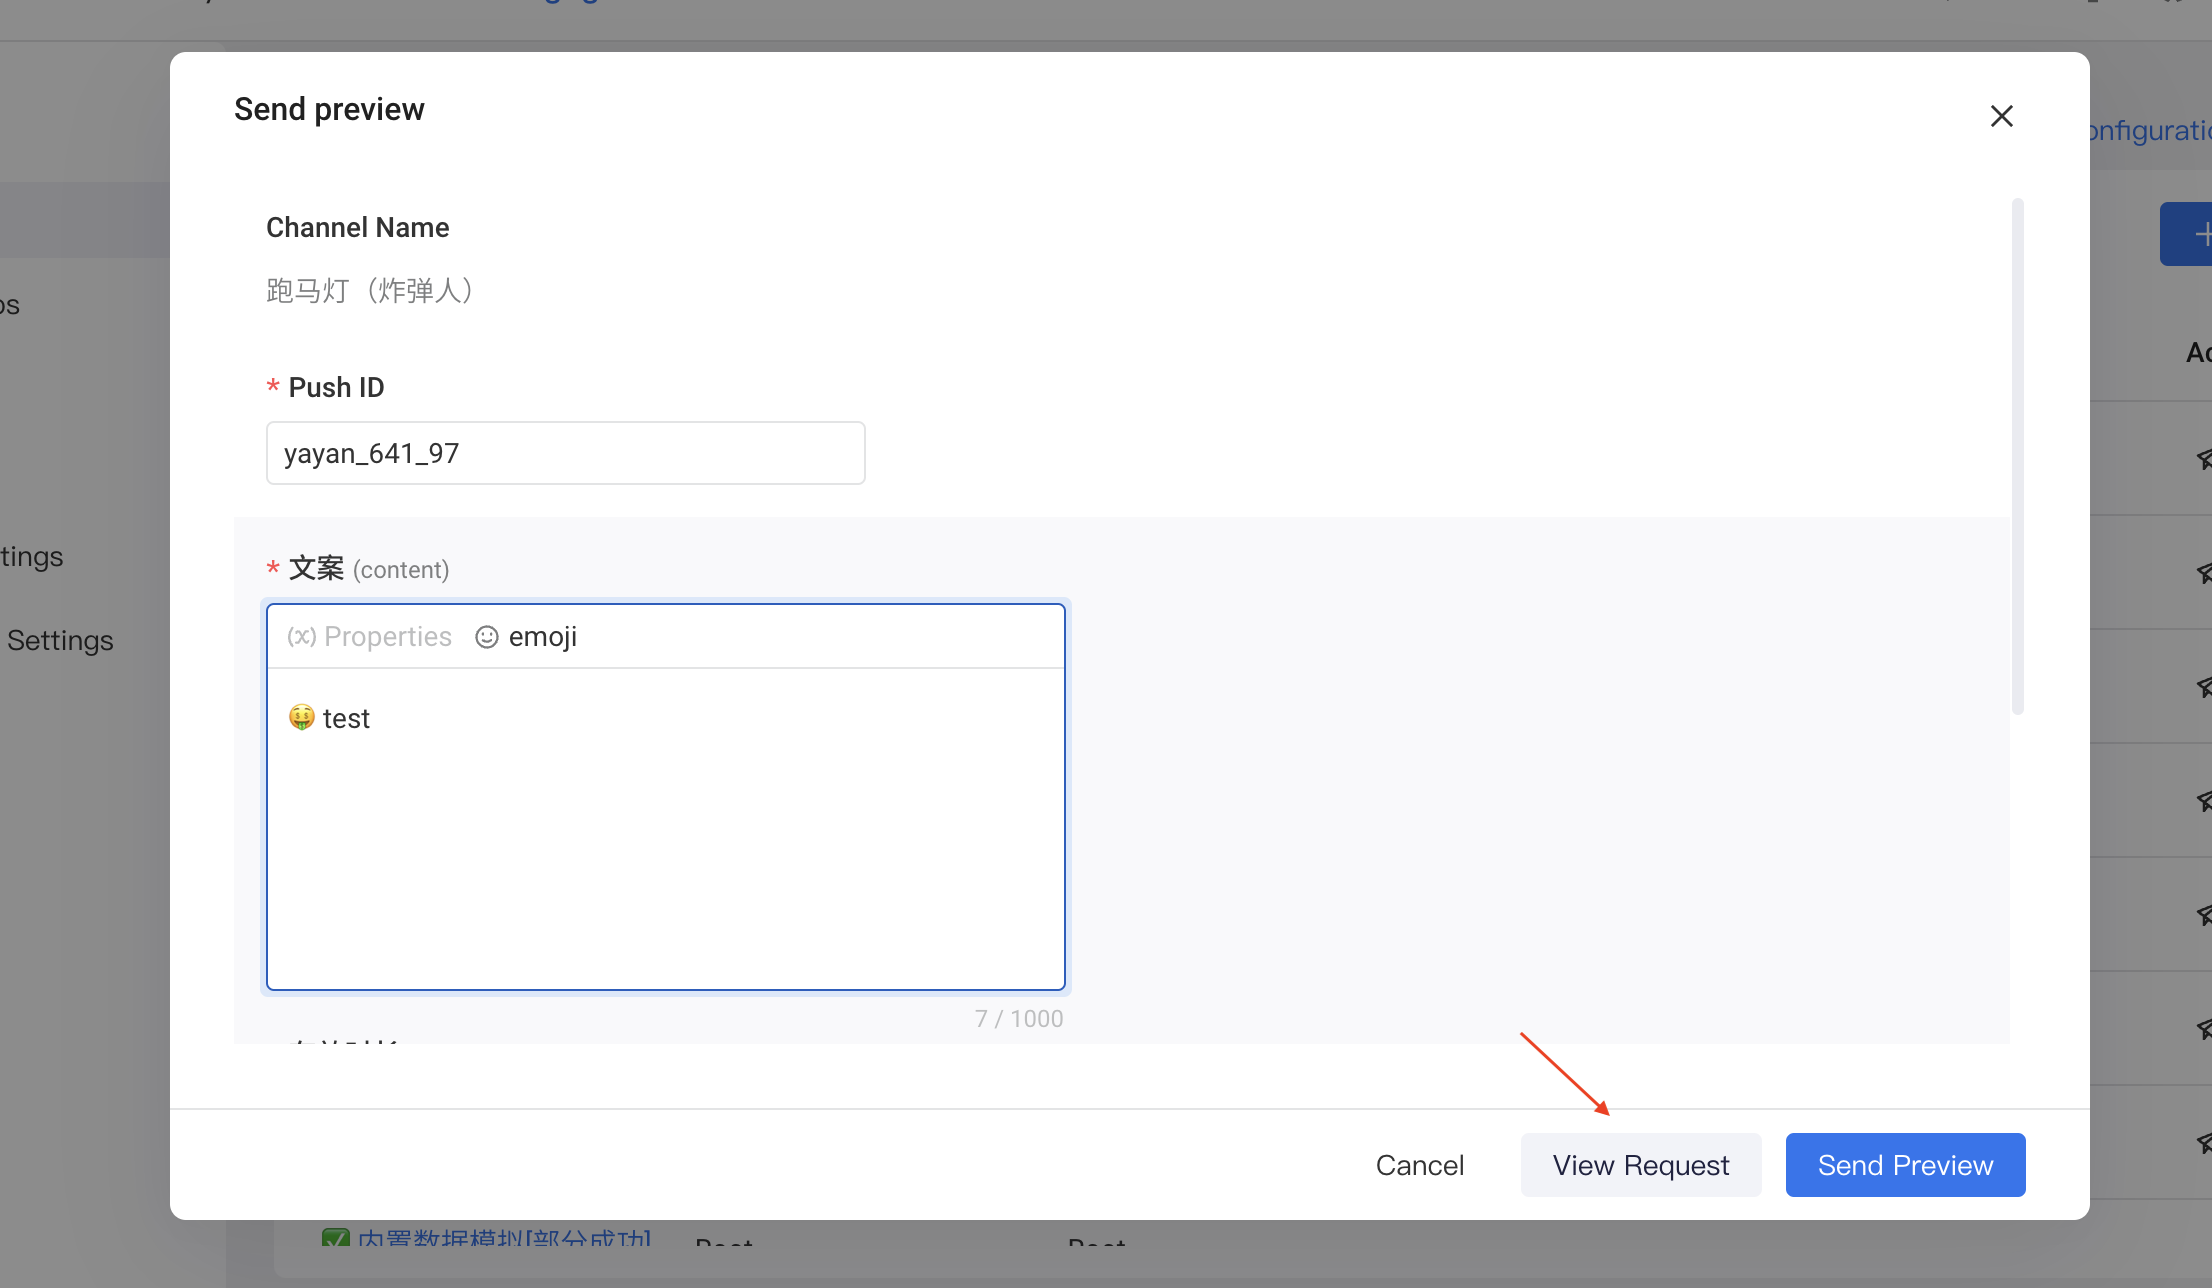
After that, the system will return the status of whether the sending test is successful, so that you can confirm the status or troubleshoot problems.
- Enable/Disable channel
- After Webhook is enabled, this channel can be selected when creating new tasks;
- After Webhook is disabled, the channel cannot be selected (not displayed in the pull-down menu), tasks that are running will be automatically ended and those pending for approval will also be automatically withdrawn.
- Edit/Delete
Edit/delete operation can only be performed after disabling the channel.
# 2.2 Push Notification
Presently, preset APP push modes offered by the system include FCM, Jpush and APNs. You can configure the corresponding channel as needed.

FCM
Click Configure Channelon the right to start FCM channel configuration.

- Channel name: The name of the FCM channel. Duplicate names are not supported.
- Push ID: The ID type of target users who receive messages, such as the FCM token in user property, supporting numerical and field user properties. In estimation of the number of target users, users having null IDs will be filtered out.
- Serverprivate key: You need to upload the FCM server key file of the project.
- Funnel setting: After enabling the reach funnel, you can configure meta event names associated with funnel steps. This way, you will be able to view conversion data of configured steps from the detailed page of operation task data.
- Passthrough parameter :You may add passthrough parameters according to your own needs. Passthrough parameters are mainly used for internal business logic processing or special display requirements of business-side applications.
JPush
Click Configure Channelon the right to start JPush channel configuration.
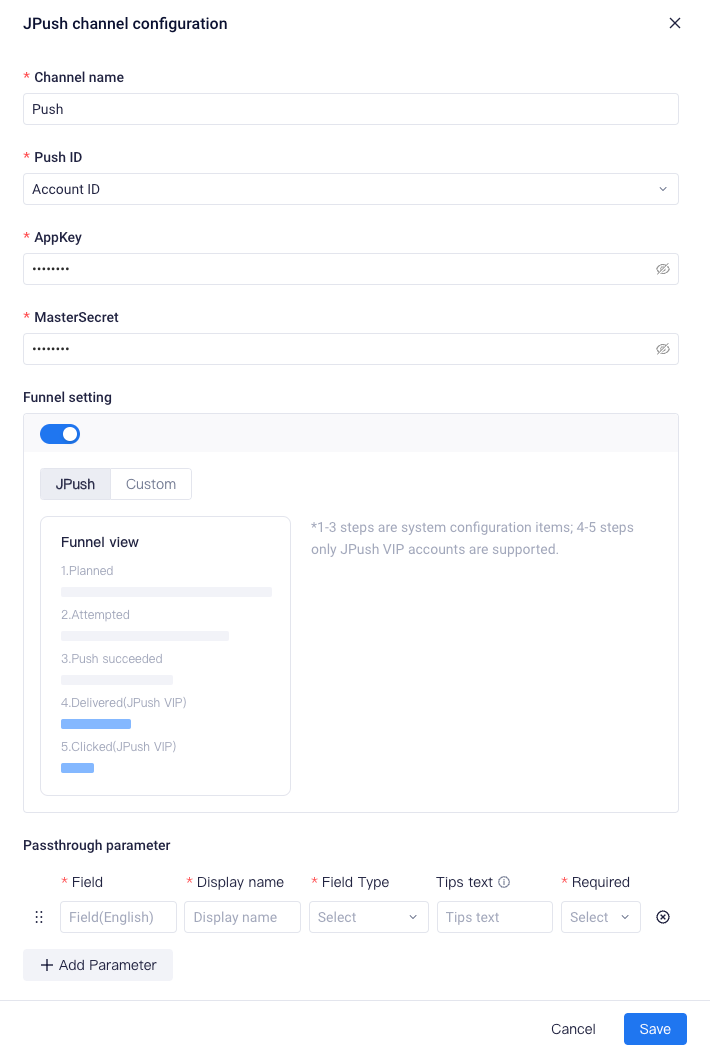
- Channel name: The name of the Jpush channel. Duplicate names are not supported.
- Push ID: The ID type of target users who receive messages, such as the jiguang_id in user property, supporting numerical and field user properties. In estimation of the number of target users, users having null IDs will be filtered out.
- AppKey: The AppKey APP registered at JPush platform.
- MasterSecret: The MasterSecret APP registered at JPush platform.
- Funnel setting: After enabling the reach funnel, you can configure meta event names associated with funnel steps. This way, you will be able to view conversion data of configured steps from the detailed page of operation task data.
- Passthrough parameter :You may add passthrough parameters according to your own needs. Passthrough parameters are mainly used for internal business logic processing or special display requirements of business-side applications.
APNs
Click Configure Channelon the right to start APNs channel configuration.
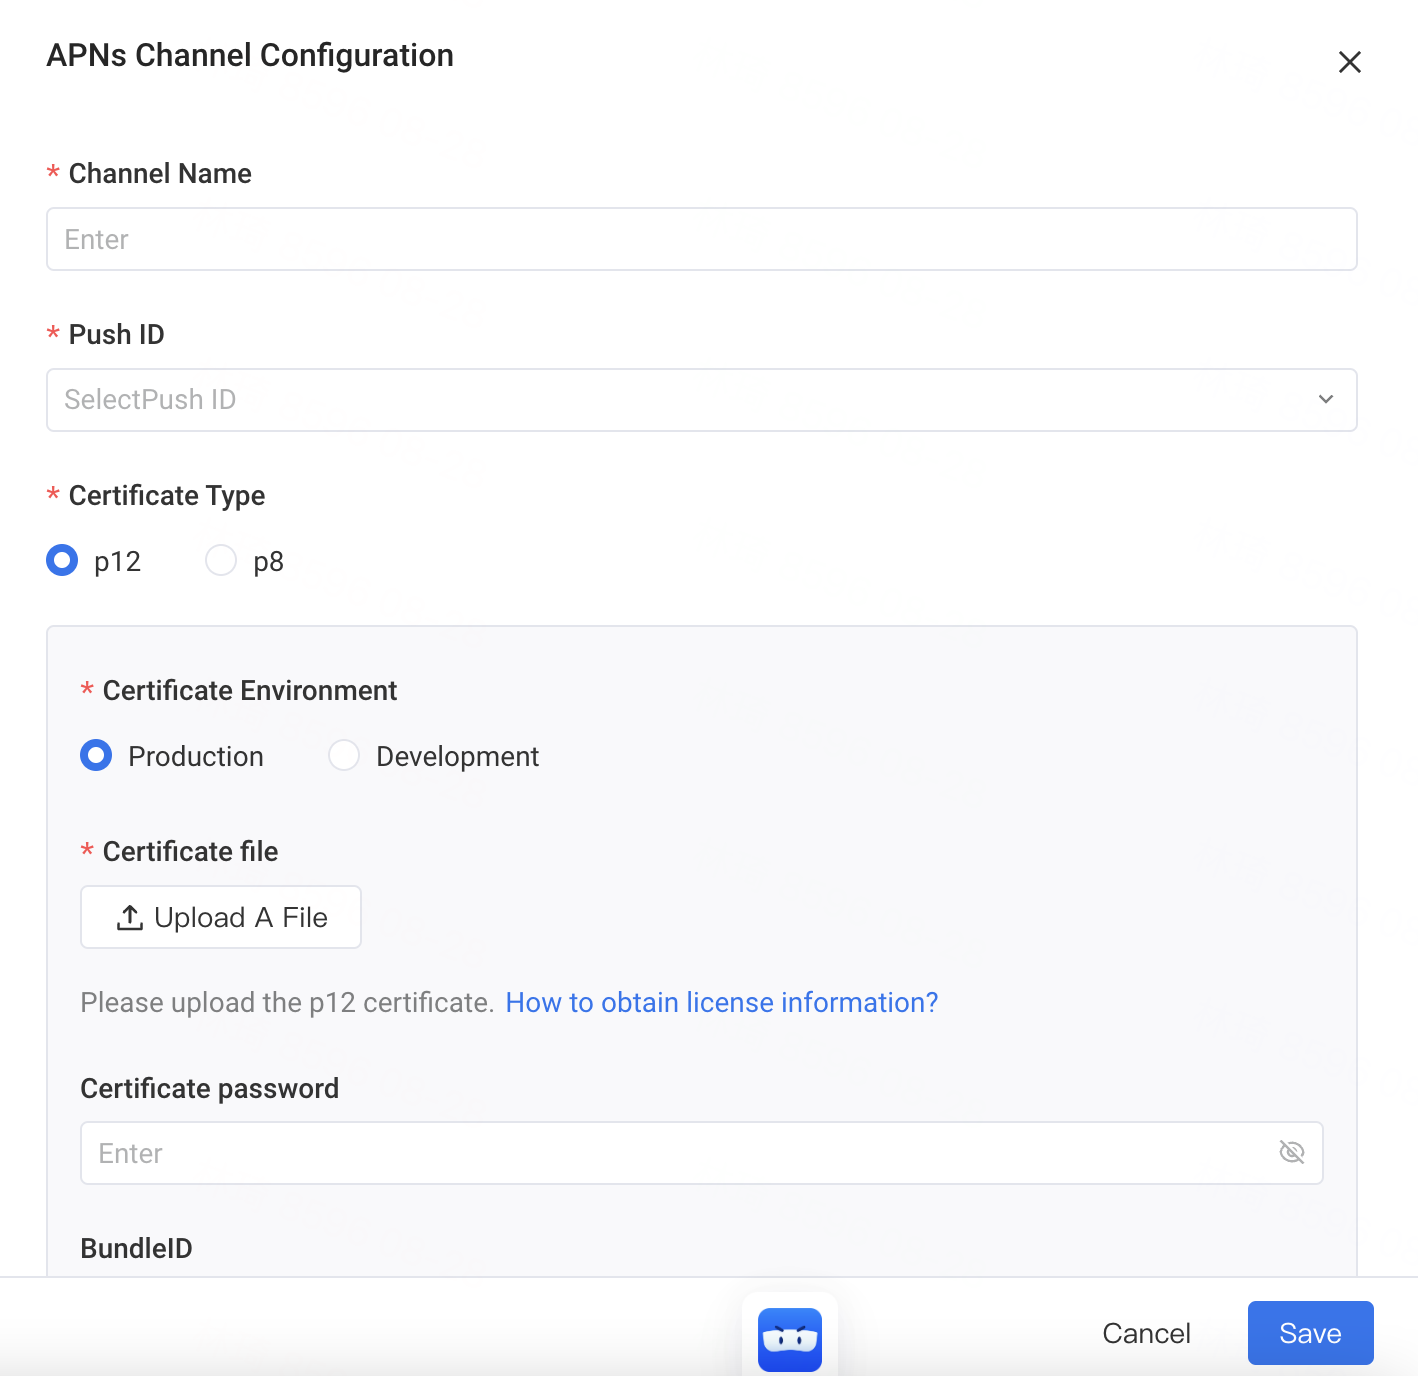
- Channel name: The name of the APNs channel. Duplicate names are not supported.
- Push ID: The ID type of target users who receive messages, such as the user ID of APNs in user property, supporting numeric and string type properties in user properties. In estimation of the number of target users, users having null IDs will be filtered out.
- Certificate Type:You can upload a P12 or P8 certificate, production or development environments are supported as well.
- Funnel setting: After enabling the reach funnel, you can configure meta event names associated with funnel steps. This way, you will be able to view conversion data of configured steps from the detailed page of operation task data.
- Passthrough parameter :You may add passthrough parameters according to your own needs. Passthrough parameters are mainly used for internal business logic processing or special display requirements of business-side applications.
Upon completing the configuration of APP push channel, you can also perform operations like testing the connectivity to various APP push channels, enabling/disabling channel and editing/deletion.
For more information about connection to APP push channels, see Android Push Integration Document or iOS Push Integration Document.