# Google AdMob Integration
TIP
Please note that the data generated by third-party Data Integration will be included in the cluster's throughput usage.
# Summary
# Interface Introduction
| Name | Type | Granularity | Attribution | Costs | Revenue | Impression | Click | Conversion |
|---|---|---|---|---|---|---|---|---|
| Reporting API | API | Metrics | ✅ | ✅ | ✅ |
Google Admob Data Reporting API Interface (opens new window) returns aggregated Revenue Ads data, including Revenue Ads displays, clicks, and Ads income data.
# Integration process
- Login to your AdMob account to get the Publisher ID.
- Login to the Google Cloud Platform (opens new window) backend, create a project with AdMob API Access, and generate a Client ID and Client Secret.
- Login to the TE backend, enter the third-party Integration module, add a new Google Admob scheme, and complete the related configuration.
- Return to the previously created GCP Admin Project, configure the correct modify address, and complete the authorization work.
- Check if the TE system has successfully received the data and completed the report construction.
# I. Preparation for Integration
# 1.1 Acquiring Publisher ID
Login to AdMob dashboard (opens new window), follow the path shown in the image below to obtain the Publisher ID

# 1.2 Create a Project within Google Cloud Platform
Next, you need to create a Google Cloud Platform Project. If you have not created a GCP Project before, you can Login to Google Cloud Platform (opens new window), click 'CREATE PROJECT' to create a Project. If you have already created a project, you can skip this step.

# 1.3 Enable Admob API
Next, you need to activate the AdMob API Access. Enter your GCP project, and in the top search bar, search for 'AdMob API' to get to the introduction page. If the area shown in the image below displays 'ENABLE', it means that the AdMob API Access is not activated for the project, please click 'ENABLE' to activate the Access.

# 1.4 setting Oauth consent screen
After activating the AdMob API Access, you should be redirected to the following page. If you are not redirected to this page, you can also find 'APIs & Services' - 'Enabled APIs & services' in the menu bar at the top left of the page, locate AdMob API in the API list, and click to enter the configuration page.
In the list, look for the AdMob API, clicking it will also take you to the page shown below. Configure the Oauth consent screen as indicated by the arrow in the image below.

Next, select 'External' at the User Type and choose CREATE to proceed to the next step:

Complete the settings (Email can use your Google account email) and click 'SAVE AND CONTINUE'

In the 'Scopes' tab, select 'ADD OR REMOVE SCOPES', check the admob.readonly in the scopes of AdMob API, click 'UPDATE' to confirm, click 'SAVE AND CONTINUE' to proceed.

Next, in the 'Test users' tab, please click 'ADD USERS' to add the email of your Google account that you use to login to the AdMob backend to the test users. After completing the addition, click 'SAVE AND CONTINUE' to proceed.

The final 'Summary' tab will display the content you configured earlier, and you can complete the configuration of the Oauth consent screen by confirming directly.
# 1.5 Create Client ID and Client Secret
After completing the configuration of the Oauth consent screen, return to the AdMob API to create the Client ID and Client Secret.
If you cannot find this page, please click on the menu bar in the top left corner, find 'APIs & Services' - 'Enabled APIs & services', and in the API list, find the AdMob API and click to enter the configuration page.
In the 'CREDENTIALS' tab, click '+ CREATE CREDENTIALS', select 'Help me choose', and enter the process of creating Client ID and Client Secret.

On the Credential Type page, select AdMob API and User Data in turn, then click 'NEXT'

Since we have already completed the configuration of Scopes when creating the Oauth consent screen, here we can directly 'SAVE AND CONTINUE' to proceed.

Next, select Web application for the Application type. In the red box marked Authorized redirect URIs, you need to configure the modify address. Since we have not yet created a plan in the TE system, please first fill in 'www.thinkingdata.cn' for the authorization address, and then change it to the official modify address after the plan creation is completed.

After completing all configurations, click 'CREATE' to create credentials. Once created, the page will display the Client ID and Client Secret, please keep these two pieces of information safe.
Finally, enter 'OAuth consent screen', click 'PUBLISH APP' in the Publishing status section to Publish the application as the current version.

# 1.6 Summary
This section primarily introduces the various tasks that need to be completed on the Google platform before Integration, please confirm that you have now obtained the following information:
- Admob's Publisher ID
- The GCP Project with Admob API enabled has obtained the Client ID and Client Secret for that Project.
# II. Plan setting
After you have completed the preparatory work on the Google platform, you can Login to the TE system and complete the setting of the new scheme in the 'Third-party Integration' module. The image below is the setting interface for Google Admob, please create the scheme according to the content of this section.

# 2.1 Authorization Information
Click the 'Authorization Information' button, and fill in the information you obtained in the previous step in the pop-up box:

# 2.2 Sync scheduled
You can set the strategy for the TE system to Pull data from Google Admob at regular intervals in the 'Sync scheduled' module, where you can choose to Pull data for a certain period of time each day. Since the Pulled data will also be counted in the data volume, it is recommended that you do not schedule to Pull data for too long a period of time.

# 2.3 Receive setting
You can control whether the data is written in the form of an event. If turned off, the data will not be written into the event table, so please do not turn off this configuration.

# 2.4 Configuration
Finally, you can control the details of the Pull data configuration in the Data Integration configuration module. This includes the time aggregation granularity of the data, the event fields and dimensions pulled, and the event name after ingestion.

The content in the Integration setting is a JSON, you can customize the setting according to the following content:
| Root Key | Key | Meaning |
|---|---|---|
| sink_event | event_mapping | After being stored, the event name can be customized, JSON type. Key corresponds to source.report_types, Value is the stored event name for that report type. |
| source | report_types | The report types that are pulled, the AdMob Reporting API supports two types of reports. For the sheet type, it is recommended that you only fill in one element, that is, pull the data of only one report at a time. Optional values: network_report, mediation_report, for more details please refer to the following content. |
| metrics | In the data, the list type metrics vary by report type and require attention when filling out. | |
| group_by | The dimensions for group-by in the data, list type, different report types support different group by, need to be careful when filling out. |
Due to significant differences in data configuration for different report types, it is recommended that you directly use the configuration templates for each level, or make fine adjustments to the templates.
# 2.4.1 Network Report template
The Network Report only includes data from AdMob monetization ads. Below is the template for this interface, which you can copy and paste in full into the integration settings. If adjustments are needed, please refer to the content of this section.
{
  "sink_event": {
    "event_mapping": {
      "network_report": "admob_network_report",
      "mediation_report": "admob_mediation_report"
    }
  },
  "source": {
    "report_types": [
      "network_report"
    ],
    "metrics": [
      "AD_REQUESTS",
      "CLICKS",
      "ESTIMATED_EARNINGS",
      "IMPRESSIONS",
      "IMPRESSION_CTR",
      "IMPRESSION_RPM",
      "MATCHED_REQUESTS",
      "MATCH_RATE",
      "SHOW_RATE"
    ],
    "group_by": [
      "DATE",
      "AD_UNIT",
      "APP",
      "COUNTRY",
      "FORMAT",
      "PLATFORM",
      "MOBILE_OS_VERSION",
      "GMA_SDK_VERSION",
      "APP_VERSION_NAME",
      "SERVING_RESTRICTION"
    ]
  }
}
- Metrics
In the Network Report data from the AdMob API, you can obtain the following metrics; by default, we store all metrics. If adjustments are needed, please add the metric names to source.metrics:
| metrics | Name | Annotation/Events Annotation |
|---|---|---|
| AD_REQUESTS | Ads request count | Incompatible with the Dimension AD_TYPE |
| CLICKS | Ads click count | |
| ESTIMATED_EARNINGS | Estimated Revenue | Estimated total Revenue, please note that this value has been magnified by 1000000 (for example, a $6.50 value is 6500000), and it needs to be divided by 1000000 when used. |
| IMPRESSIONS | Ads impressions | Total display count |
| IMPRESSION_CTR | Click-through Rate | |
| IMPRESSION_RPM | CPM (Cost per thousand impressions) | The estimated Ads income per thousand impressions corresponds to the backend's eCPM. Please note that this value has been magnified by 1,000,000 (for example, a value of $1.03 is 1,030,000), and it needs to be divided by 1,000,000 when used, Incompatible with the Dimension AD_TYPE |
| MATCHED_REQUESTS | Ads request success count | After requesting ads, the numerical type of the number of times a response is received |
| MATCH_RATE | Request success rate | equal to Ads request success count / Ads request count, Incompatible with the Dimension AD_TYPE |
| SHOW_RATE | Ads Display Rate | equal to Ads impressions / Ads request success count |
The following are the Analytics dimensions for the Network Report data of the AdMob API. If adjustments are needed, please add the metric name to source.group_by:
| Dimension | Meaning | Description | Default |
|---|---|---|---|
| DATE | group-by by day | Group by time in the format of YYYYMMDD (e.g., '20210701'), At least one time dimension is required. | Yes |
| MONTH | group-by by month | Group by time in the format of YYYYMM (e.g., '202107'), At least one time dimension is required. | |
| WEEK | group-by by week | Group by time using the format of the first day of the week in YYYYMM (e.g., '202107'), At least one time dimension is required. | |
| AD_UNIT | group by ad unit | Retrieve the unique ID of the ad unit (such as 'ca-app-pub-1234/1234'), Using this dimension will automatically add the APP Dimension. | Yes |
| APP | group-by application | Retrieve the application ID (e.g., 'ca-app-pub-1234~1234') | Yes |
| AD_TYPE | group-by Ads type | The value is either 'text' or 'image', Need to note incompatibility with metrics AD_REQUESTS, MATCH_RATE, and IMPRESSION_RPM | |
| COUNTRY | group-by country (region) | Retrieve the country (region) codes from the Unicode CLDR standard, such as 'US', 'FR'. | Yes |
| FORMAT | Group by the type of ad unit | Retrieve the type of ad unit, such as 'banner', 'native'. | Yes |
| PLATFORM | group-by platform | Values such as 'Android', 'iOS' | Yes |
| MOBILE_OS_VERSION | Group by operating system version | Value is 'iOS 13.5.1' | Yes |
| GMA_SDK_VERSION | Group by GoogleMobileAds SDK version | The value is 'iOS 7.62.0'. | Yes |
| APP_VERSION_NAME | Group by APP version | Android retrieves the versionName from PackageInfo, iOS retrieves the app version name from CFBundleShortVersionString. | Yes |
| SERVING_RESTRICTION | Group by the restriction mode of the ads pair. | 'Non-Personalization ads' | Yes |
In the template, use the DATE field from the data, which is the time aggregated by day, and after padding with zeros, use it as the #event_time for that piece of data.
The event name used in the template is -- admob_network_report
# 2.4.2 Mediation Report template
The Mediation Report includes AdMob Revenue ads as well as ads data from other third-party platforms. Below is the template for this interface, which you can copy and paste in full into the integration settings. If adjustments are needed, please refer to the content of this section:
{
  "sink_event": {
    "event_mapping": {
      "network_report": "admob_network_report",
      "mediation_report": "admob_mediation_report"
    }
  },
  "source": {
    "report_types": [
      "mediation_report"
    ],
    "metrics": [
      "AD_REQUESTS",
      "CLICKS",
      "ESTIMATED_EARNINGS",
      "IMPRESSIONS",
      "IMPRESSION_CTR",
      "MATCHED_REQUESTS",
      "MATCH_RATE",
      "OBSERVED_ECPM"
    ],
    "group_by": [
      "DATE",
      "AD_SOURCE",
      "AD_SOURCE_INSTANCE",
      "AD_UNIT",
      "APP",
      "MEDIATION_GROUP",
      "COUNTRY",
      "FORMAT",
      "PLATFORM"
    ]
  }
}
- Metrics
In the Mediation Report data from the AdMob API, you can obtain the following metrics; by default, we store all metrics. If adjustments are needed, please add the metric names in source.metrics:
| metrics | Name | Description and Notes |
|---|---|---|
| AD_REQUESTS | Ads request count | |
| CLICKS | Ads click count | |
| ESTIMATED_EARNINGS | Estimated Revenue | The total revenue estimated by AdMob, please note that this value has been magnified by 1,000,000 (for example, a value of $6.50 is 6,500,000), and it needs to be divided by 1,000,000 when used. |
| IMPRESSIONS | Ads impressions | Total display count |
| IMPRESSION_CTR | Click-through Rate | |
| MATCHED_REQUESTS | Ads request success count | After requesting ads, the numerical type of the number of times a response is received |
| MATCH_RATE | Request success rate | equal to Ads request success count / Ads request count |
| OBSERVED_ECPM | Estimate eCPM | third-party login estimated eCPM value (due to third-party data permission issues, this value may currently be 0) |
The following are the Analytics dimensions for the Mediation Report data of the AdMob API. If adjustments are needed, please add the metrics name to source.group_by:
| Dimension | Meaning | Description | Default |
|---|---|---|---|
| DATE | group-by by day | Group by time in the format of YYYYMMDD (e.g., '20210701'), At least one time Dimension is needed,We use DATE as the default group-by for time. | Yes |
| MONTH | group-by by month | Group by time in the format of YYYYMM (e.g., '202107'), At least one time dimension is required. | |
| WEEK | group-by by week | Group by time using the format of the first day of the week in YYYYMM (e.g., '202107'), At least one time dimension is required. | |
| AD_SOURCE | group-by media source | Group by media source ID and Channel name. | Yes |
| AD_SOURCE_INSTANCE | Group by media source instance | Group by media source instance ID and media source instance name. | Yes |
| AD_UNIT | group by ad unit | Retrieve the unique ID of the ad unit (such as 'ca-app-pub-1234/1234'), Using this dimension will automatically add the APP Dimension. | Yes |
| APP | group-by application | Retrieve the application ID (e.g., 'ca-app-pub-1234~1234') | Yes |
| MEDIATION_GROUP | group-by aggregate groups | Group by Aggregate Group ID and Aggregate Group Name | Yes |
| COUNTRY | group-by country (region) | Retrieve the country (region) codes from the Unicode CLDR standard, such as 'US', 'FR'. | Yes |
| FORMAT | Group by the type of ad unit | Retrieve the type of ad unit, such as 'banner', 'native'. | Yes |
| PLATFORM | group-by platform | Values such as 'Android', 'iOS' | Yes |
| MOBILE_OS_VERSION | Group by operating system version | The value is 'iOS 13.5.1', Need to note incompatibility with metrics ESTIMATED_EARNINGS, OBSERVED_ECPM | |
| GMA_SDK_VERSION | Group by GoogleMobileAds SDK version | The value is 'iOS 7.62.0', Need to note incompatibility with metrics ESTIMATED_EARNINGS, OBSERVED_ECPM | |
| APP_VERSION_NAME | Group by APP version | Android retrieves the versionName from PackageInfo, iOS retrieves the app version name from CFBundleShortVersionString, Need to note incompatibility with metrics ESTIMATED_EARNINGS, OBSERVED_ECPM | |
| SERVING_RESTRICTION | Group by the restriction mode of the ads pair. | The value is 'Non-personalized ads', Be aware of incompatibility with the metric ESTIMATED_EARNINGS |
In the template, use the DATE field from the data, which is the time aggregated by day, and after padding with zeros, use it as the #event_time for that piece of data.
The event name used in the template is -- admob_mediation_report
# 2.5 Standardize field
If the following event properties exist in the data, we will automatically standardize them:
| Original field | Standardization field | Meaning |
|---|---|---|
| publisher_id | te_ads_object.ad_account_id | Ads Account ID |
| ad_unit | te_ads_object.ad_group_id | Ads group ID |
| ad_source | te_ads_object.media_source | Media Channel or Revenue Channel |
| app | te_ads_object.app_id | Application ID |
| platform | te_ads_object.platform | platforms, such as Android, iOS, etc. |
| country | te_ads_object.country | Country/Region Code |
| [USD] | te_ads_object.currency | Currency of cost or revenue |
| impressions | te_ads_object.impressions | Exposure Volume |
| clicks | te_ads_object.clicks | Click-through rate |
| Estimated earnings (throughput usage will be divided by 1000000) | te_ads_object.revenue | Revenue income |
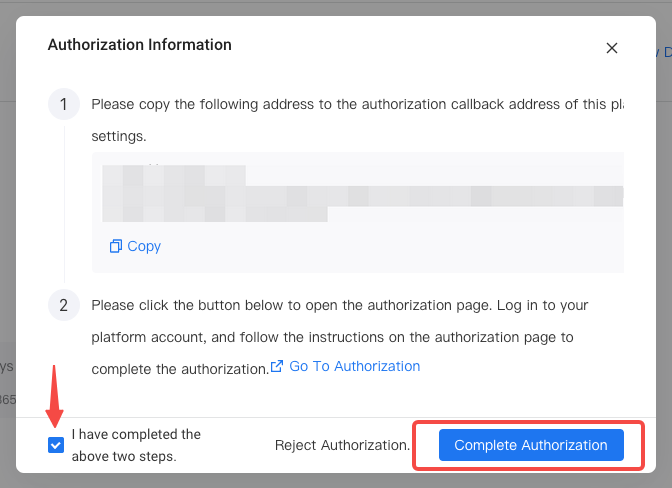
# 2.6 Complete authorization
After completing the setting, you can click 'Save and Authorize' in the upper right corner to save the project setting. Next, you need to complete the final permissions work:
First, please copy the address from the first step in the 'Authorization Information' page that pops up.

Next, go back to Google Cloud Platform (opens new window), edit the previously created credentials (you can find the previously created Oauth 2.0 Client ID in the sidebar under 'APIs & Services' - 'Credentials', click the edit button behind it to enter the edit page). Add the recently copied modify address to the Authorized redirect URIs section, and click 'Save' to complete the changes.

Finally, go back to the TE interface and click 'Go to Authorization', which will open the Google AdMob authorization page.

Please Login to your Google account on AdMob and follow Google's instructions to complete the subsequent authorization actions.

After you have completed the authorization, please click on 'I have completed the above two steps' in the lower left corner of the 'Authorization Information', and then click on 'Complete Authorization' in the lower right corner to finish the configuration. At this point, you have completed the Data Integration for Google AdMob.