# macOS
TIP
Before you begin, please read Preparation before Data Ingestion
The minumum system version required by Mac SDK is OSX 10.10
TIP
The iOS SDK has been adapted for macOS since v3.0.0
# 1. SDK Integration
# 1.1 Automatic Integration
- CocoaPods
- Create a Podfile in your Xcode project directory by running
pod initin your terminal.
Edit the generated Podfile , and add the following lines:
platform :osx, '10.10'
target 'YourProjectTarget' do
  pod 'ThinkingSDK'
end
- Navigate to your project's root folder and run
pod installin your terminal
After success, the following tip will appear in the terminal:
pod install
- Open project
After the command is executed successfully, .xcworkspace file will be generated, indicating that you have successfully imported the macOS SDK. Open the .xcworkspace file to start the project (note: the .xcodeproj file cannot be opened at the same time)
# 2. Initialization
Complete the initialization operation in main thread, the sample code is as follows:
Instruction on parameters:
APPID: The APPID of your project, which can be found on the project management page of the TE.SERVER_URL:- If you are using a SaaS version, please check the receiver URL on this page
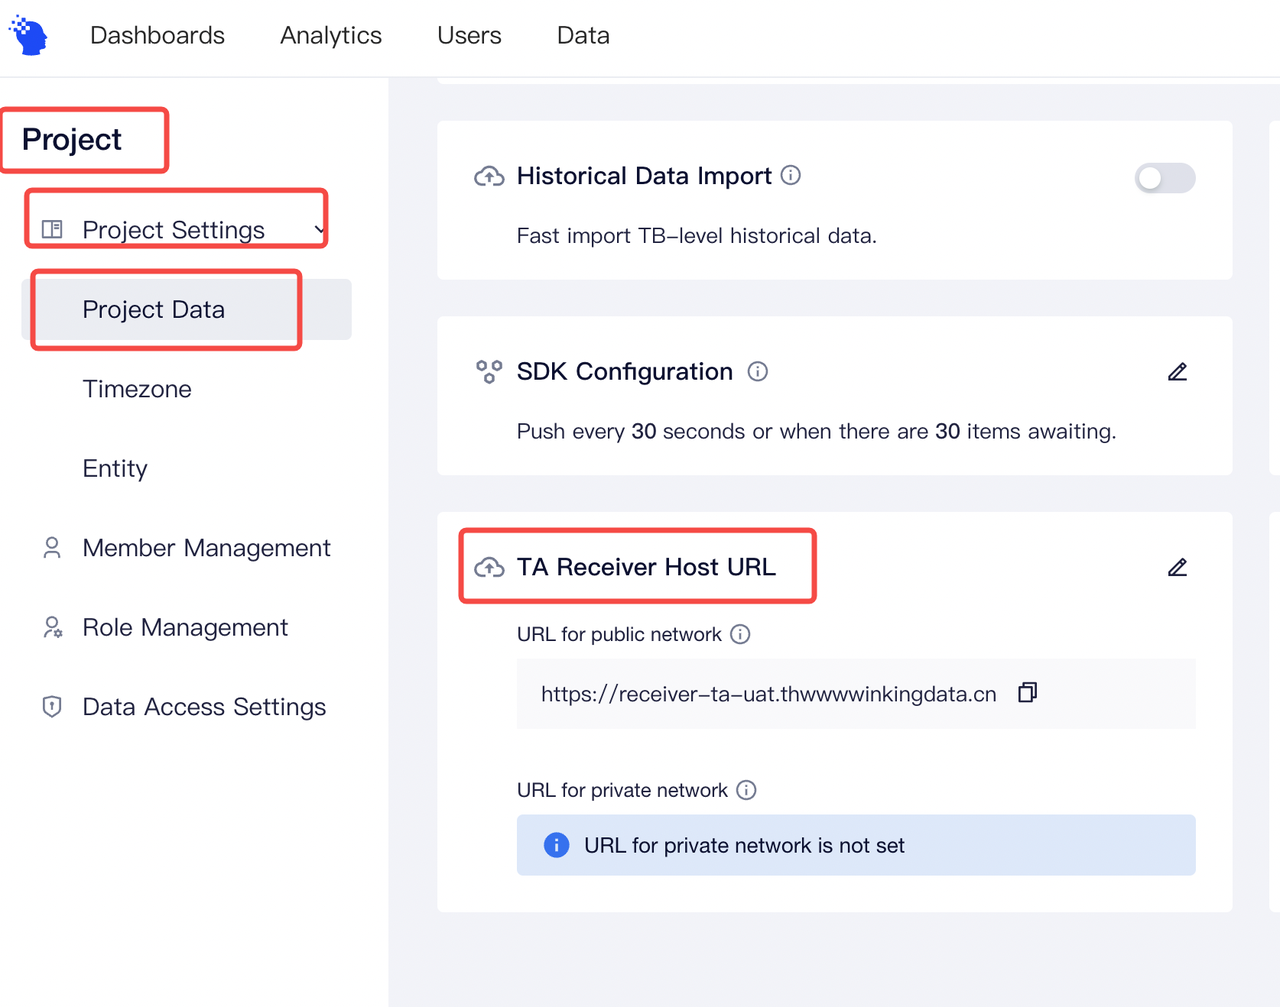
- If you are using a SaaS version, please check the receiver URL on this page
If you use the private deployment version, you can customize the data tracking URL .
# 3. Common Features
We suggested that you read User Identification Rules before using common features; SDK would generate a random number that would be used as the distinct ID, and save the ID locally. Before the user logs in, the distinct ID would be used as the identification ID. Note: The distinct ID would change after the user reinstalled the APP or used the APP with a new device.
# 3.1 Login
When the users log in , login could be called to set the account ID of the user. TE would use the account ID as the identification ID, and this ID would be saved before logout is called. The previous account ID would be replaced if login has been called multiple times.
Login events wouldn't be uploaded in this method.
# 3.2 Super Properties
Super Properties refer to properties that each event might have. You can call setSuperProperties to set Super Properties. It is recommended that you set Super Properties first before sending data. Some important properties (e.g., the membership class of users, source channels, etc.) should be set in each event. At this time, you can set these properties as Super Properties.
Super Properties would be saved in local storage, and will not need to be called every time the APP is opened. If the Super Properties set previously are uploaded after calling setSuperProperties, previous properties would be replaced.
- Key is the name of the property and refers to the string type. It must start with a character, and contain numbers, characters (insensitive to case, and upper cases would be transformed into lower cases by TE) and underscores "_", with a maximum length of 50 characters.
- Value, the value of the property, supports string, numbers, Boolean, time, object, array object, and array
The requirements for event properties and user properties are the same with that for Super Properties
# 3.3 Sending Events
You can call track to upload events. It is suggested that you set event properties based on the data tracking plan drafted previously. Here is an example of a user buying an item:
The event name is string type. It could only start with a character and could contain figures, characters, and an underline "_", with a maximum length of 50 characters.
# 3.4 User Properties
You can set general user properties by calling userSet API. The original properties would be replaced by the properties uploaded via this API. If no user properties are set before, user properties would be created. The data type of newly-created user properties must be the same as the uploaded properties. User name setting is taken as the example here:
# 4. Best Practice
The following sample code covers all the above-mentioned operations. It is recommended that the SDK be used in the following steps:
if (authorized) {
    // enable log
    [TDAnalytics enableLog:NO];

    // SDK needs to be initialized on the main thread
    NSString *appid = @"APPID";
    NSString *url = @"SERVER_URL";
    TDConfig *config = [[TDConfig alloc] init];
    config.appid = appid;
    config.serverUrl = url;
    [TDAnalytics startAnalyticsWithConfig:config];

    [TDAnalytics login:@"TD"];

    NSDictionary *superProperties = @{
        @"channel": @"ta",
        @"age": @1,
        @"isSuccess": @YES,
        @"birthday": [NSDate date],
        @"object": @{
            @"key":@"value"
        },
        @"object_arr":@[
            @{
                @"key":@"value"
            }
        ],
        @"arr": @[@"value"],
    };
    [TDAnalytics setSuperProperties:superProperties];

    NSDictionary *eventProperties = @{@"product_name": @"book"};
    [TDAnalytics track:@"product_buy" properties:eventProperties];

    // "username" is "ThinkingData"
    [TDAnalytics userSet:@{@"username": @"ThinkingData"}];
}